Search 2.0

Showing posts with label Canning. Show all posts

Thursday, September 9, 2010

Sauerkraut Homemade In Canning Jars

This year is the first year we had a bumper crop of cabbage. Since I can't picture myself, and my husband eating stir fry for the next few months I decided to try to make sauerkraut. My husband has fond memories of his mom putting up homemade sauerkraut.
This is the easy way, of doing it.

Ingredients,
raw cabbage sliced very thin
canning jars with lids and rings
 canning salt
water

Slice cabbage very thin, place in large bowl. Fill jars with water half way, add 1 tablespoon of salt to each jar. Begin filling jars with cabbage to top, make sure salt water covers cabbage. Place lids on jars do not tighten real tight. The cabbage starts to ferment with in a few days, which will cause the water to bubble out of the top of the lids. Place jars of cabbage on a plate to catch over flow from each day.
Every morning open lids of jars, with a spoon push down the cabbage. You don't want it to turn dark. It will turn dark if it's exposed to the air.
The sauerkraut will be ready in 10 days. Process in water bath for 30 minutes to preserve. Make sure you use a new lid, wipe top of lid also. My sister-in-law Maggie uses her sauerkraut in pizza, but I prefer mind in Ruben sandwiches. 

Sunday, August 29, 2010

Homemade Grape Juice

One of the most exciting thing  that I learned to do, when I moved to the country was to make, and can my own concord grape juice. It's a lot easier than it sounds. We have a 40 year old grape vine which still produces concord grapes.


Ingredients:
canning 2 quart jars
lids
rings to fit over jars
grapes
sugar
large canner
Pick only the dark grapes, pull off the stems, place in the bucket to wash.
Make sure to wash jars with soap, and water place into the oven at 200 degrees for 30 minutes to sterilize.


My grapes are sweet, so I only use 1/2 cup of sugar, pour into jars.
Fill jars half way up with the concord grapes.
Heat up lids on stove , the rings rubber will soften.
Pour water in the jars 2 inches from the top head space.
Wet the top of jar with clean paper towel, then dry with another clean paper towel. This is to make sure there isn't any particle trapped between the jar,  and the lid preventing a perfect seal.
Place sterilized lid on jar, and ring over the lid to seal. Tighten normal. Do not over tighten or the jars won't seal properly.
Place jars in caner, place lid, bring to a boil. Lower heat to continue steady boiling. After boiling begins time for 30 minutes. The grapes will rise to the top, settling down after the juice cools. The vacuum is created when the jar contents start to cool it can take up to 10 minutes to hear that beautiful ping sound, some times the lids seal with out making a sound. Enjoy this juice after the season is over, lovely at Christmas time.

Wednesday, July 28, 2010

Tomato Season Canning Tomatoes

This is the season when the tomatoes start to turn, I have so many of them, when they all begin to ripen at the same time. I can my tomatoes every year. I rarely have to buy can tomatoes from the grocery store. Which  adds money to my grocery budget.
First step in canning tomatoes is to wash the tomatoes, cut any bruised areas, or dark spots, and stem area. Cut in to wedges. See Canning Apple Cider from my July's blog  it goes into more detail on canning.
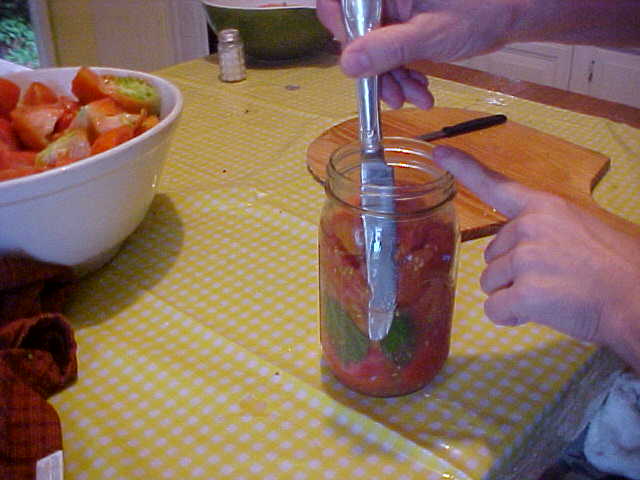
After sterilizing the jars, press the tomatoes till the juice runs. Midway through I put a leaf of basil for pretty, it also adds flavor to the tomatoes. Run a butter knife along the sides to pop any air bubbles that may be present.
Add a teaspoon of salt on the top.
Wipe the top of the canning jar with a wet paper towel, followed by a dry one. To ensure that it is squeeky clean. Any debrie on top will cause canning failure.


Place warm new lids on jars, with rings over lids. Tighten normal. Place in canning pot. filled with water up to the ring. Place lid on top bring to a boil. When it comes to a boil lower heat so it not a rapid boil. Time for 30 minutes.

Thursday, July 15, 2010

Refrigerator Pickles

Are you a pickle fan? My grandsons are, they especially love my refrigerator pickles. Since I don't can the pickles through a hot bath, they stay crisp instead of rubbery.
When the pickles are ready to pick from the garden, I gather them and wash off those sharp thistles. Pack them into the large 1/2 gallon jars.


The cucumbers have little sharp splinters all over them that need to be scrub off. Be careful use rubber gloves to protect your hands. I use a green dish scrubber.


Ingredients: cucumbers, 2-1/2 gallon jars, washed, and sanitized. Fresh Dill, 6 garlic cloves, 3 cups

White vinegar, 8 cups water, 1/2 cup salt, 2 teaspoons pepper corns, 3 teaspoons pickling spice. Pack as many cucumbers as fit into your jars. Add garlic, and dill.


.
 
Using funnel pour vinegar mixture into jars.


Keep refrigerated.should be ready in 3 weeks.

Thursday, July 1, 2010

How to Can Homemade Apple Cider

I have an interest in preserving the old ways of living. My hope is that we don't loose the knowledge on how, to  preserve, and live off the land, which were common knowledge to our  great grandparents. They are very important to keep alive.This kind of living helps stretch your grocery dollars further. There is a sense of accomplishment when you can look at your final product, even joy wells up inside me, and says good job.


Canning apple cider. When you have buckets and buckets of apples, apple cider making is the number 1 choice of what to do with them.  Canning the cider preserves it for years, lets face it you shouldn't drinks 10 gallons of apple cider in 1 week. I enjoy breaking the seal of the fresh taste of summer, in the fall, and winter season.

The equipment you will need are the following.
Canning pot large. 20- 1/2 gallon jars large mouth or small mouth. Large or small lids, with matching new rings. Funnel for pouring in to jars. Jar holder for pulling jars out of hot water. Plenty of counter space.
First things first. Must clean jars with hot soapy water using bottle brush cleaner.

Place lids in pan of water, heat on low you just want the rubber part to soften, not melt off. When placed on the jar it creates a seal.

Place clean wet jars in oven at 200 degrees for 30 minutes.
Place apple cider in a large pot to boil. When apple cider heats up it starts forming scum.
I use a large wooden spoon to skim the scum off the top of the hot apple cider.

Using funnel pour boiling hot apple cider into jar. Leave 1 1/2" head space.
Before placing lid. Take clean paper towel wet it and wipe lip of jar, followed by a dry paper towel. this step is very important. The slightest bit of food, or juice can prevent proper sealing of the jar.

Place warmed lid on jar. Place ring on top of lid. Tighten normal, not to tight or it will pucker, not to loose or it will not create the vacuum it needs to seal.
Place hot jars in water bath to boil.
Water level should cover the juice height in jars. Bring to a boil. Not to rapid or the bottles will burst. A slow gentle boil  time for 20 minutes.
If you do it right you'll hear a wonder pop sound within 10 minutes of pulling jars out to cool.
The lid should look like this after it pops. Flat. It should not have a hump in the center. And when opening the jar of juice, a sucking vacuum sound should be heard.

Monday, June 28, 2010

Homemade Apple Cider

It's apple cider time at my house. The early Transparent are ready to be picked (green apples), and  June apples (red apples) which make great homemade apple sauce, or cider.

We have a old timey apple press which we use in the making of apple cider.
One person cranks the apple press while another person
 tosses the apples in to be crushed.
The barrel is then pushed forward to drain the juice. There is a bowl underneath to catch the apple juice.
The press is rolled down up on the crushed apples.
Fresh juice.

The juice is then passed through a cheese cloth.
Fresh homemade apple cider. Next blog I will instruct on how to how to can apple cider