Search 2.0

Monday, December 27, 2010

Gingerbread House Tutorial

My Granddaughters look froward to this every year. Decorating the gingerbread house but before we can decorate the house we need to make the house with the gingerbread cookies tutorial
Ingredients:
6 cups all purpose flour
1 cup dark corn syrup
1/2 cup molasses
1 1/2 teaspoon salt
1/2 teaspoon ground cloves
4 teaspoons cinnamon
4 teaspoons ginger
1 cup dark brown sugar
1 cup butter room temperature
1 teaspoon baking powder
1/2 teaspoon baking soda
2 large eggs
Ceramic Mold for gingerbread house
corn starch for dusting
assorted candies for decorations
large plate to place house on
royal icing

In a large bowl sift together flour, baking powder, baking soda, ginger, cinnamon, cloves, salt, set aside.

Cream together in a large bowl, butter and brown sugar, add eggs, molasses, and dark brown corn syrup, mix well til fluffy.

Add flour mixture with butter mixture, mix by hand til well combined. Divide dough in to thirds, wrap in plastic. Chill for 4 hours, at this time also place the ceramic mold in the freezer.

Royal Frosting
3 tablespoons of Wilton meringue Powder
4 cups powdered sugar
6 cups warm water
Place in large bowl with mixer, mix for 7 minutes, it will make a stiff frosting for the house , and accessories.
Remove ceramic mold from freezer dust with corn starch, it works better than the nonstick spray(which is recommended by the mold manufacture)
Press the dough into the mold.

Stick a fork into the dough, and peel back  the dough.

Lay on the cookie sheet keep about 1 inch apart. Bake at 350 degrees for 15 minutes, til center is stiff, but not  browned around the edges. Allow to cool completely before assembling the house.


The first year I tried making the house I made the mistake of trying to put it together, not letting  it dry completely before the children began to decorate it. Of course the house collapsed.
 An adult needs to assemble the house and allow it dry before decorating it. Place royal icing in a parchment bag, run a bead of icing along the bottom, and side of cookie. Use a plastic bowl to hold it together til it hardens, and dries.
Also run a bead of frosting on the inside of the house, for extra holding power.

Place frosting on the top of the walls of the house, and also on the top where the roof meets.  Allow frosting to dry hard, it does not take long about an hour, then begin decorating. Enjoy the moment and treasure the memory.

Gingerbread Cookies

Memories of making gingerbread cookies around the holidays. When the weather gets cold, dunking one of these cookies in a glass milk, or hot chocolate mmm yummy..  I have started making these cookies with my granddaughters. They are very young at this time, but they really enjoy the experience of helping grandma in the kitchen. Their favorite part is the decorating.

Ingredients:
6 cups flour all purpose
1 cup dark corn syrup
1/2 cup molasses
2 large eggs
1 1/2 teaspoons salt
1/2 teaspoon ground cloves
4 teaspoons ground cinnamon
4 teaspoons ground ginger
1 cup dark brown sugar
1 cup room temperature butter
1 teaspoon baking powder
1/2 teaspoon baking soda

In a large bowl sift together flour, baking soda, baking powder, ginger, cinnamon, cloves salt, and, set aside.

In a medium bowl cream butter, and brown sugar till fluffy, add eggs, corn syrup, and molasses.

Add flour mixture to cream mixture by hand till well combined. Divide dough into thirds, and wrap in plastic. Chill for 4 hours or till the dough get stiff.


Roll out dough to 1/8 inch thick. Cut into desired shapes. Bake at 350 degrees on a greased pan for 15 minutes, or until gingerbread is firm in the center, but not dark around the edges.


As you can see my little granddaughter Marisa likes to decorate the cookies.

Tuesday, December 21, 2010

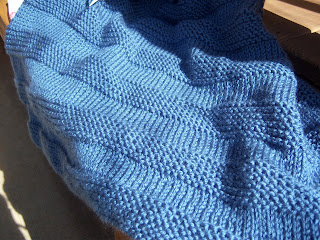
Knitting Pretty Boy Blue Baby Blanket

I am one of these persons that loves to have my hands busy, whether crafting or cooking it is one of the joys of living for me. I decided to knit a  pretty boy blue baby blanket for my pastors baby.  I selected the type of yarn,  the color combinations. Knitting to me has more movement in it than crocheting. It also makes for a great swaddling blanket, because it has give to it. If you don't know how to knit watch my mini video tutorial on how to cast on stitches , and how to do purl stitch also how to do knit stitch .


 SuppliesCrochet Hook size h
Baby Soft Country Blue yarn 3 skeins, 6 0z
Circular knitting needles size 6- 24 inches long
Gauge
6 stitches across measure 2 inches
this baby blanket measures 33 by 33 inches square approx
This pattern is worked in the purl, and knit pattern.
Cast on 110 stitches.
Purl the first 12 rows.
Knit  and purl the next 10 next rows to make the stockinette stitch.
repeat til you finish 2 skeins of yarn


For picot edging crochet 3 single crochets in the next 3 stitches, on the 3 single crochet chain 3 slip stitch, repeat process all around the blanket.


Knitting How to Cast on Stitches

How to Cast on Stitches
I decided to try how to show people how to knit, so many people seem to have an interest in learning, but feel it's to hard to learn. It has become a lost art. My Aunt Lena showed me how to knit when I was pregnant with my first born. I really enjoyed the movement of my hands, creating something beautiful. I love the stretch that knitting has compared to crocheting.
After 25 years of not knitting I picked up a set of knitting needles, and began poking around til it all came back to me, now I am knitting for my granddaughters, and friends. It's so enjoyable I taught 2 of my coworkers how to knit also.  I think you might enjoy it too, give it a try.

Start with 3 yards of yarn folded in half.


Make a slip knot

Make a sling shot, grabbing under neath string by thumb. Bring over to right of hand. Going on top of string.

Pulling at the same time releasing string from thumb area.
Continue til you have the amount of stitches required for your project

>

Knitting Childs Knitted Hat

Traveling again this time to South Carolina, visiting with family. We went to a charming dinning place, a reconverted old mill. in Pickens. Enjoyed eating a pulled pork sandwich, while watching the river flow by.
I had a little bit of time where I was able to knitt this quick little childs knitted hat, with a pretty little flower in the center.


  1. 1 Ball Bernat Baby Sport Yarn Lavender,or color of your choice1 Ball 4 ply 100% cotton yarn yellow.
  2. 1 Ball 4 ply 100% cotton yarn baby green.
  3. Size 6 circular knitting needles 16 inches.
  4. Large blunt needle.
  5. 4 double pointed knitting needles size 6.
  6. 1 sunflower button.
8. 1 crochet hook size H

Size: 18 months Circumference: 18 months
Gauge: 9 stitches +12 rows= 2 inches
Cast on 64 stitches on knitting needles.Row 1 to 35 knit stockinette stitch in a circular pattern
Row 36 to 48 knit 10, knit together 2 after every 10 stitch to decrease size of hat. After 48 rows you should wind up with 10 knit stitches. Cut yarn off leaving at least 6 inches. Take blunt needle and go through the center of the 10 stitches to secure them from unraveling.
To make flower:With yellow yarn.
Chain 4, join together, chain 2 more,to make double crochet, you will have a total of 2 double crochet. next make half double crochet. Slip stitch. This is your first petal. Do this 4 more times.


Last petal
To make leaves chain 4 with baby green yarn, double crochet, cut yarn about 3 inches long. With blunt needle attach the flower, and leaves to the hat. With regular thread and needle attach button to the flower.

Wedding crafts-Rose Bud Bridal Favor


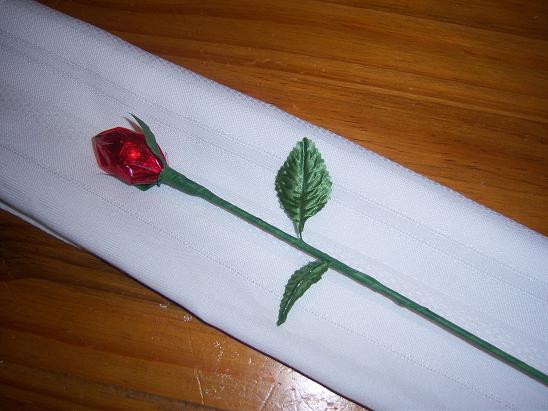
This one is a good one, I made these rosebud party favors for my nephew Carl and Summers wedding, these looked so adorable laying on the reception tables. I got a lot of  positive feed back from the guests at there wedding. This would also be cute as a love bouquet, for someone trying to impress their sweetheart. Real easy to make. Let me know what you think.


Supplies:
Bag of Hershey Kisses silver or gold foil.
Bag of 12 inch wooden skewers.
Thread
Green floral tape.
Highlander red clearphane cellophane cut into 5 1/2 circles.
Floral leaves.


To make rosebud party favor. Cut cellophane into a 5 1/2 inch circle. Stack 2 Hersey kisses fat end to fat end. Wrap cellophane around the Hersey Kisses, and twist. Insert wooden skewer blunt side into the twisted cellophane to where it touches the candy. Do not puncher the foil. Tighten the cellophane around it again. Add the 2 calyx's made out of the floral tape. To make calyx cut floral tape diagonally twist at bottom. Wrap green floral tape around all of the calyx's cellophane, and wooden skewer, pulling tape and twisting. Midway add the floral leaves, Continue till you cover the whole wooden skewer. Watch my video, and let me know what you think. Thanks.


Friday, December 10, 2010

Childrens Crafts Christmas Star Ornaments


The Christmas Star ornaments are a good project for children. Just make sure an adult cuts out the stars, because of the precise cutting required to make the star shapes, but saying that, this is a good project for little hands to decorate.

 Materials
1 piece of poster white
sharp scissors
glue
glitter glue in red, silver, and gold
sparkling crystal glitter
pen
star shape to use as pattern
Draw stars on poster board.
Cut out star shapes.

Draw with a ruler draw a straight line from the tip of the star to the inside corner of the star. 5 times.

Turn over, use the lines to help fold the star. This way the pen marks won't show.


The folds should match this sample.


Place a line of glue a 1/4 of an inch from the cut boarder of the star.
Place folded star on flat star, hold for a few minutes til the glue holds.

I find if I press in the center it glues better, but do not press flat.
When dry cut away the extra paper.

Dry and ready to decorate.

Here you see my 4 year old granddaughter decorating her stars.

Here is the 3 year old painting her stars with the glitter glue.

Make sure to lay down newspaper in the work area, the glitter glue and glitter does tend to get all over.

The crystal glitter is tossed on top to add more shimmer.

Set them up to dry.

Arrange them on the tree the points help to nestle them into the tree.

Thursday, December 9, 2010

Childrens Crafts Christmas Gingerbread Garland


 Here is another fun, and easy child safe project. These gingerbread cookies will  last you year after year. I live in the mountains of Virginia where there is a lot of humidity, and the cookies that I made from 2002 are  still as good as new. The cinnamon smell is no longer there, but they are as cute as can be. Adult supervision is required.


Supplies:
4oz white glue
Gingerbread cookie cutter
Cinnamon 3oz
Wire
3 colors of tulip slick  dimensional paint white, black, red
Ribbons with color of your choice, I also like to rip rustic fabric into strips


In a small bowl pour all the cinnamon, add 3/4 of the glue and mix, it should not be mushy, but more like cookie dough, mix till well incorporated.

Roll out, if sticky roll between 2 pieces of wax paper.
Place cookie cutter on top of dough, cut out gingerbread shape, make a hole at each side of gingerbread man arms.using thooth pick, set on flat board to air dry.
It takes at least 24 hours for cookies to be dry enough to decorate. They will shrink some. You will have a small amount left over that won't be large enough to make a cookie, I usually make rustic hearts out of that little bit of cookie dough it adds to the garland.


Using the Tulip Slick Paints decorate the gingerbread cookies. This paint goes on puffy and drys puffy mocking real icing.
Here is Marisa threading the metal wire through the holes at the hands.
Bianca threads the gingerbread hearts.

Cut ribbons to tie on the bare wires.

So very cute, I believe your young children will  enjoy making this project.